netatmo api で温度取得

netatmo apiを利用してTemperatureを取得したので、自分の備忘として。

phpとpythonでデータ取得を試してみた。

phpでは、battery_vpの取得方法がわからん。

pythonでは、WeatherStationが複数ある場合、個々の取得方法がわからん。

今回は、1拠点のバッテリー数値の取得は、pythonで行い、温度はphpを使った。

netatmoのModule1が外部温度センサーに割り当てられbattery_vpがある。
この数値がイマイチよくわからない

/*for raingauge and outdoor module*/
class NABatteryLevelModule
{
/* Battery range: 6000 … 3600 */
const BATTERY_LEVEL_0 = 5500;/*full*/
const BATTERY_LEVEL_1 = 5000;/*high*/
const BATTERY_LEVEL_2 = 4500;/*medium*/
const BATTERY_LEVEL_3 = 4000;/*low*/
/* below 4000: very low */
}

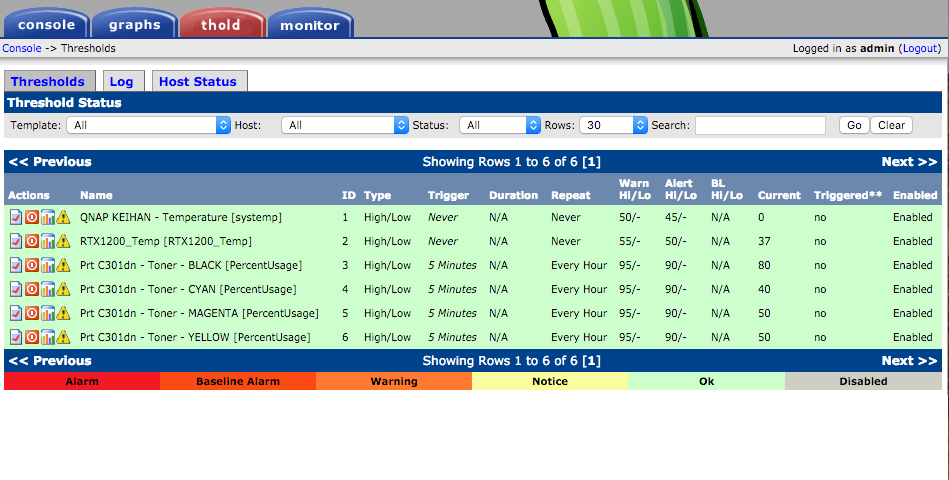
のように書かれているので、cactiでThresholdsを設定する。
値は、Warnigを4100、Alertを4500とした。

Netatmo-API-PHP

netatmo.php

#!/usr/bin/php
<?php /** * Example of Weather station API * If you need more details, please take a glance at https://dev.netatmo.com/doc */ define('__ROOT__', dirname(dirname(__FILE__))); require_once (__ROOT__.'/src/Netatmo/autoload.php'); require_once 'Utils.php'; require_once 'Config.php'; /** * Prints a list of devices * */ function printDevices($devices, $title = NULL) { if(!is_null($devices) &amp;&amp; is_array($devices) &amp;&amp; !empty($devices)) { if(!is_null($title)) printMessageWithBorder($title); foreach($devices as $device) { printWSBasicInfo($device); } } } $scope = Netatmo\Common\NAScopes::SCOPE_READ_STATION; $config = array("client_id" =&gt; $client_id,
                "client_secret" =&gt; $client_secret,
                "username" =&gt; $test_username,
                "password" =&gt; $test_password);

$client = new Netatmo\Clients\NAWSApiClient($config);

//Authentication with Netatmo server (OAuth2)
try
{
    $tokens = $client-&gt;getAccessToken();
}
catch(Netatmo\Exceptions\NAClientException $ex)
{
    handleError("An error happened while trying to retrieve your tokens: " .$ex-&gt;getMessage()."\n", TRUE);
}

//Retrieve user's Weather Stations Information

try
{
    //retrieve all stations belonging to the user, and also his favorite ones
    $data = $client-&gt;getData(NULL, TRUE);
//    printMessageWithBorder("Weather Stations Basic Information");
}
catch(Netatmo\Exceptions\NAClientException $ex)
{
    handleError("An error occured while retrieving data: ". $ex-&gt;getMessage()."\n", TRUE);
}

if(empty($data['devices']))
{
    echo 'No devices affiliated to user';
}
else
{

    $users = array();
    $friends = array();
    $fav = array();
    $device = $data['devices'][0];
    $tz = isset($device['place']['timezone']) ? $device['place']['timezone'] : "GMT";

    //devices are already sorted in the following way: first weather stations owned by user, then "friend" WS, and finally favorites stations. Still let's store them in different arrays according to their type
    foreach($data['devices'] as $device)
    {

        //favorites have both "favorite" and "read_only" flag set to true, whereas friends only have read_only
        if(isset($device['favorite']) &amp;&amp; $device['favorite'])
            $fav[] = $device;
        else if(isset($device['read_only']) &amp;&amp; $device['read_only'])
            $friends[] = $device;
        else $users[] = $device;
    }

    //print first User's device Then friends, then favorite
    printDevices($users, "User's weather stations");
//    printDevices($friends, "User's friends weather stations");
//    printDevices($fav, "User's favorite weather stations");

}
?>;

バッテリーデータを取得するのは、こんな感じで調整した。

print ($module['battery_vp'])."\n";

netatmo.shでデータ取得
netatmo.sh

#!/bin/sh

cd /usr/share/cacti/site/scripts/netatmo-api/bin
/usr/bin/php ./netatmo.php &gt;/tmp/netatmo.data

indoor=`cat /tmp/netatmo.data |sed  -e '11,11!d'|cut -d' ' -f2`
outdoor=`cat /tmp/netatmo.data |sed  -e '29,29!d'|cut -d' ' -f2`
indoorh=`cat /tmp/netatmo.data |sed  -e '45,45!d'|cut -d' ' -f2`
outdoorh=`cat /tmp/netatmo.data |sed  -e '63,63!d'|cut -d' ' -f2`

printf ' Indoor:'$indoor
printf ' Outdoor:'$outdoor
printf ' Indoorh:'$indoorh
printf ' Outdoorh:'$outdoorh

rm /tmp/netatmo.data

exit 0

netatmo-api-python

netatmo.py

#!/usr/bin/python3
# encoding=utf-8

# 2013-01 : philippelt@users.sourceforge.net 

# Just connect to a Netatmo account, and print internal and external temperature of the default (or single) station
# In this case, sensors of the station and the external module have been named 'internal' and 'external' in the
# Account station settings.

import lnetatmo

authorization = lnetatmo.ClientAuth()
devList = lnetatmo.DeviceList(authorization)

#print ("Current temperature (inside/outside/battry): %s / %s °C" %
#        ( devList.lastData()['Indoor']['Temperature'],
#          devList.lastData()['Outdoor']['Temperature']),
#         devList.lastData()['Outdoor']['battery_vp']
#)

print   "Inndoor:",devList.lastData()['Indoor']['Temperature']
print   "Outdoor:",devList.lastData()['Outdoor']['Temperature']
print   "Battery:",devList.lastData()['Outdoor']['battery_vp']

#print('External module battery : ', "OK" if int(devList.lastData()['Outdoor']['battery_vp']) &gt; 5000 else "0" )

netatmo.sh

cd /usr/share/cacti/site/scripts/
python netatmo.py &gt; /tmp/netatmo

indoor=`cat /tmp/netatmo|grep Inndoor|cut -b10-`
outdoor=`cat /tmp/netatmo|grep Outdoor|cut -b10-`
batt=`cat /tmp/netatmo|grep Battery|cut -b10-`

printf ' Indoor:'$indoor
printf ' Outdoor:'$outdoor
printf ' Battery:'$batt

rm /tmp/netatmo

exit 0

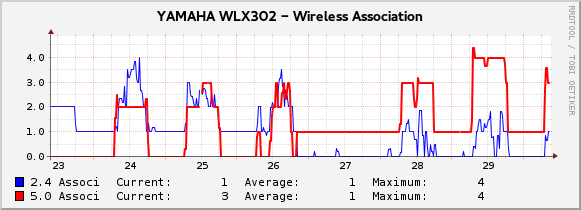
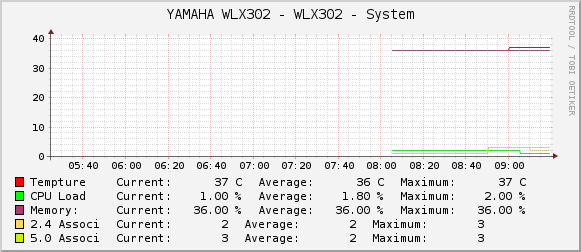
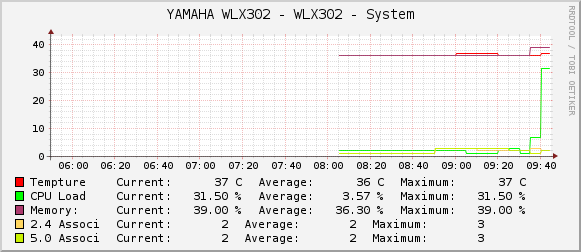
上に書いたソースを元に試行錯誤の結果このようなグラフで妥協した。

graph_image

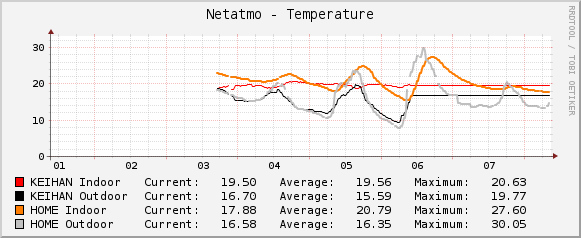
温度データは取得出来ているのだが、グラフが結構途切れてしまう。

YAMAHA WLX302 cacti script

先日の記事でYAMAHA WLX302 cacti templateのscriptを修正した。

前回は、curlで取得したHTTP DATAを加工して利用していたが、データの取得が不安定だった。
原因は特定していませんが、HTTPから取得する際にデータの取りこぼしがありました。

今回は、telenetを利用して取得していきます。
wlx302のtelnetは1ユーザーしか許可していない。
よって別端末からwlx302にtelnetでログインしていると、データは取得出来ません。

まずは、telnetにログインしてデータを取得するscriptを設置
使用しているwlx302のtelnetはloginIDとpasswdは設定していない。
設定している場合は、一番最初のechoのあとに、ID
次のechoの後に、passwdを入力

#!/bin/sh
sleep 1;echo
sleep 1;echo
sleep 3;echo "show status wlan-controller ap list member"
sleep 3;echo "show environment"
sleep 1;echo exit

これを、wlxauto.shで保存し、telnetへパイプで渡す。sleepはネットワーク環境等で調整する。

/bin/sh /usr/share/cacti/site/scripts/wlxauto.sh |telnet 192.168.xxx.xxx
Trying 192.168.xxx.xxx...
Connected to 192.168.xxx.xxx.
Escape character is '^]'.


Password: 

WLX302 BootROM Ver.1.xx

WLX302 Rev.12.xx.xx (Tue Jan  5 17:53:58 2016)
  Copyright (c) 1994-2015 Yamaha Corporation. All Rights Reserved.
00:a0:de:xx:xx:xx, 00:a0:de:xx:xx:xx, 00:a0:de:xx:xx:xx
Memory 256Mbytes
> 
> show status wlan-controller ap list member 
[00:a0:de:xx:xx:xx]
Connection      : --
Last update     : Mar 30 09:14:24 2016
System name     : WLX302_S44xxxxxx
System location : 
IP address      : 192.168.xxx.xxx
 [module1]
 Channel              : 1
 Transmit power rate  : 100
 Number of connection : 1
 [module2]
 Channel              : 36
 Transmit power rate  : 100
 Number of connection : 3

> show environment 
WLX302 BootROM Ver.1.xx
WLX302 Rev.12.xx.xx (Tue Jan  5 17:53:58 2016)
  main:  WLX302 ver=00 serial=S44xxxxxx MAC-Address=00:a0:de:xx:xx:xx MAC-Addre
ss=00:a0:de:xx:xx:xx MAC-Address=00:a0:de:xx:xx:xx
CPU:   1%(5sec)   4%(1min)   4%(5min)    Memory: 28% used
Firmware: internal  Config. file: 0  
Boot time: 2016/03/25 21:52:58 +09:00
Current time: 2016/03/30 09:14:58 +09:00
Elapsed time from boot: 4days 11:22:00
Security Class: 1, FORGET: ON, TELNET: OFF
Inside Temperature(C.): 36
Power: PoE
State of cooperation: NONE
> Connection closed by foreign host.

このようにデータが流れれば取得出来ている。
wlxget.shを書き直す。
データ加工はうまく書けないので、いじくり回した結果このようになりました。

/bin/sh /usr/share/cacti/site/scripts/wlxauto.sh |telnet 192.168.xxx.xxx > /tmp/wlxtelnetget.log

wlxload=`cat /tmp/wlxtelnetget.log |sed  -e '36,36!d'|cut -c29-30`
wlxmem=`cat /tmp/wlxtelnetget.log |sed  -e '36,36!d'|cut -c50-51`
wlxtemp=`cat /tmp/wlxtelnetget.log |sed  -e '42,42!d'|cut -c25-26`
wlx24as=`cat /tmp/wlxtelnetget.log |sed  -e '25,25!d'|cut -c24-25`
wlx5as=`cat /tmp/wlxtelnetget.log | sed -e '29,29!d'|cut -c24-25`

wlxload=`echo $wlxload`
wlxmem=`echo $wlxmem`
wlxtemp=`echo $wlxtemp`
wlx24as=`echo $wlx24as`
wlx5as=`echo $wlx5as`

# wlxload:4 wlxmem:29 wlxtemp:38 wlx24as:1 wlx5as:4

#CPU (5sec)
printf ' wlxload:'$wlxload
printf ' wlxmem:'$wlxmem
printf ' wlxtemp:'$wlxtemp
printf ' wlx24as:'$wlx24as
printf ' wlx5as:'$wlx5as

rm /tmp/wlxtelnetget.log

exit 0

走らせてみる。

$ sh wlxget.sh 
Connection closed by foreign host.
 wlxload:4 wlxmem:28 wlxtemp:36 wlx24as:1 wlx5as:3$

wlx302_graph_image

庭木の剪定

1年ぶりに庭木2本の剪定をした。

あまり大きくならないよう、頻繁に剪定しているつもりだけど、この時期は新芽が伸びるのが早いです。

剪定を始めて8年目、ずいぶん時間が経ちました。

始めて剪定したときと比べて、少し見栄えがするように切れたとおもう。

表側の花壇をもう少し華やかにしたいけど、難しい。

良く考えてみると、庭師さんってすごいですね。

YAMAHA WLX302 cacti template

ヤマハ 無線LANアクセスポイント WLX302会社の無線LAN APは、YAMAHA WLX302を使っています。

WLX302はsnmpを話せますので、cactiのAssociated Data QueriesでSNMP – Interfaces Statistics追加することで、Interfaceの監視が出来ます。

他にもCPU loadやメモリ使用率、wireless associationなども監視したいのですが、snmpの項目が見当たりません。

しかし、ブラウザで見ると(http://wlx302/cgi-bin/admin/manage-system.sh)、内部的には、情報を持っているようなので、その情報をcurlやwgetを利用し取得して、cactiに渡すようにします。

wlx302-1

wlx302-2

今回データの取得には、curlを利用しました。
取得する情報の行数を確認し、設定する。
例えば、temptureだと、186行目にあるので、

sed -e '186,186!d'|sed '$s/.$//'

とすれば、温度の数値のみ取り出せます。

WLX302のファームウェアなどの変更で、情報取得行の変更があれば、この行数を変更する。

cactiにscriptを設置する。

ubuntu なので、/usr/share/cacti/site/scripts/wlxget.shを配置する。

#!/bin/sh

#CPU load
#Memory Usage
#Tempture
#2.4G Assosiation
#5G Assosiation
#Change to Your WLX302 address and userID,password

/usr/bin/curl -o /tmp/wlxlog -u [userID]:[passwd] http://[wlx302]/cgi-bin/admin/manage-system.sh

wlxload=`cat /tmp/wlxlog |sed  -e '182,182!d'|sed '$s/.$//'`
wlxmem=`cat /tmp/wlxlog |sed  -e '186,186!d'|sed '$s/.$//'`
wlxtemp=`cat /tmp/wlxlog |sed  -e '202,202!d'|sed '$s/.$//'`
wlx24as=`cat /tmp/wlxlog |sed  -e '237,237!d'|sed '$s/.$//'`
wlx5as=`cat /tmp/wlxlog |sed  -e '264,264!d'|sed '$s/.$//'`

printf ' wlxload:'$wlxload
printf ' wlxmem:'$wlxmem
printf ' wlxtemp:'$wlxtemp
printf ' wlx24as:'$wlx24as
printf ' wlx5as:'$wlx5as

exit 0

設置できたら、実際に情報を取得してみる。

$ /usr/share/cacti/site/scripts/wlxget.sh

wlxload:1 wlxmem:36 wlxtemp:37 wlx24as:2 wlx5as:3

のように、表示出来れば情報の取得は出来ています。
念のため、/tmp/wlxlogを削除しておく。

$ rm /tmp/wlxlog

あとは、templateを流し込み、Graph Managementからaddすれば、グラフの描画が始まります。

Graph templateとdata templateを置いておく。

cacti_template_wlx302_-_system

wlx_graph_image

wlx302には、見える化ツールという機能があるのですが、これをONにするとCPU負荷がスゴク高くなります。もうすこし負荷が下がると常時ONに出来るのですがね。

wlx_graph_image2

ネットワークだと、こんな感じに仕上がった。

cactiGraph

今後、必要に応じて、tholdを設定すればOKだ。ちなみに、今はRTX1200とQNAPの温度監視とプリンタ トナーの監視を行っている。

thold

一通り、cactiの設定は出来たが、あと自宅で使っているBrother MFC-960DNのインクレベルのsnmpデータがわからない。


NEC MultiWriter 8450n for cacti

1502-02
cactiのホストを新規に作成したので、いろいろテンプレートを探し直して、ようやくcactiを復旧できた。
つかったpluginとtemplateを載せておこう。

以前から、cactiを使って機材の監視を行っていたが、MultiWriter 8450nのprinter suplyのデータが、16進で帰ってくるので、変換してみた。

ちなみに、使っているcacti templateは、SNMP Printer Templateです。

このtemplateで取得しているのは、iR-ADV C2230Fとこの記事のMultiWriter 8450nです。

iR-ADV C2230Fでは、Waste Tonerのデータは取得出来ていません。

cacti template

WmultiWirterの文字列対応は、下記の通り。

45:50:E3:82:AB:E3:83:BC:E3:83:88:E3:83:AA:E3:83:83:E3:82:B8 - EPカートリッジ
E5:AE:9A:E7:9D:80:E3:83:A6:E3:83:8B:E3:83:83:E3:83:88 - 定着ユニット
E6:89:8B:E5:B7:AE:E3:81:97:E3:83:88:E3:83:AC:E3:82:A4:E3:83:AD:E3:83:BC:E3:83:AB:E3:82:AD:E3:83:83:E3:83:88 - 手差しトレイロールキット
E3:82:AB:E3:82:BB:E3:83:83:E3:83:88:E3:83:AD:E3:83:BC:E3:83:AB:E3:82:AD:E3:83:83:E3:83:88:28:E7:94:A8:E7:B4:99:E3:83:88:E3:83:AC:E3:82:A4:31:29 - カセットロールキット(用紙トレイ1)
E3:82:AB:E3:82:BB:E3:83:83:E3:83:88:E3:83:AD:E3:83:BC:E3:83:AB:E3:82:AD:E3:83:83:E3:83:88:28:E7:94:A8:E7:B4:99:E3:83:88:E3:83:AC:E3:82:A4:32:29 - カセットロールキット(用紙トレイ2)
E3:82:AB:E3:82:BB:E3:83:83:E3:83:88:E3:83:AD:E3:83:BC:E3:83:AB:E3:82:AD:E3:83:83:E3:83:88:28:E7:94:A8:E7:B4:99:E3:83:88:E3:83:AC:E3:82:A4:33:29 - カセットロールキット(用紙トレイ3)
52:4F:53:E3:83:A6:E3:83:8B:E3:83:83:E3:83:88 - ROSユニット
E3:82:AB:E3:82:BB:E3:83:83:E3:83:88:E3:82:B7:E3:83:A5:E3:83:BC:E3:83:88:E3:82:AD:E3:83:83:E3:83:88:28:E7:94:A8:E7:B4:99:E3:83:88:E3:83:AC:E3:82:A4:31:29 - カセットシュートキット(用紙トレイ1)
E3:82:AB:E3:82:BB:E3:83:83:E3:83:88:E3:82:B7:E3:83:A5:E3:83:BC:E3:83:88:E3:82:AD:E3:83:83:E3:83:88:28:E7:94:A8:E7:B4:99:E3:83:88:E3:83:AC:E3:82:A4:32:29 - カセットシュートキット(用紙トレイ2)
E3:82:AB:E3:82:BB:E3:83:83:E3:83:88:E3:82:B7:E3:83:A5:E3:83:BC:E3:83:88:E3:82:AD:E3:83:83:E3:83:88:28:E7:94:A8:E7:B4:99:E3:83:88:E3:83:AC:E3:82:A4:33:29 - カセットシュートキット(用紙トレイ3)